Wednesday, March 5, 2014

Italian Flounder

I have been cooking fish once each week and trying to find a different fish to prepare so as to not get bored.  I get bored sometimes preparing the same food, and sometimes my children lead me in that direction with asking me to make the same food over and over again.  Right now I'm trying new foods and letting them figure out if they want to try what I'm making.  While at Costco trying to find a fish I hadn't eaten before, I found Flounder and decided to go with that.  My Flounder recipe is Italian inspired in that it uses traditional Italian ingredients and is in part based on an Italian recipe I found.  

 This was so good tasting.

 Ingredients for this Recipe are:

2 lbs. Flounder
1 cup Spanish Pimento Olives
1 lb. Sweet Tomatoes
4 sprigs cup Fresh Rosemary
5 cloves of Garlic
1/2 cup Parmesan Cheese
2 tablespoons Olive Oil
Salt 
Freshly Ground Black Pepper

 Chop olives, tomatoes, and rosemary.
Press garlic through garlic press.

Preheat 12 inch sauté pan with olive oil over medium flame.
Place olives, tomatoes, garlic, and rosemary in pan and saute a couple of minutes.

 Place flounder over sauce, sprinkle salt and grind black pepper onto fish.
Cover pan with lid and cook for five minutes, remove lid,  check if fish is opaque, if not stir 
gently and cover with lid for another minute or two.

 The fish is ready.

Serve with a side of risotto (recipe found here) as my family did or maybe a piece of crusty bread.

Enjoy!

Italian Flounder
Printable Recipe Found Here

2 lbs. Flounder
1 cup Spanish Pimento Olives
1 lb. Sweet Tomatoes
4 sprigs cup Fresh Rosemary
5 cloves of Garlic
1/2 cup Parmesan Cheese
2 tablespoons Olive Oil
Salt 
Freshly Ground Black Pepper

Chop olives, tomatoes, and rosemary.
Press garlic through garlic press.

Preheat 12 inch saute pan with olive oil over medium flame.
Place olives, tomatoes, garlic, and rosemary in pan and saute a couple of minutes.
Place flounder over sauce, sprinkle salt and grind black pepper onto fish.
Cover pan with lid and cook for five minutes, remove lid,  check if fish is opaque, if not stir gently and cover with lid for another minute or two.

Enjoy!

Pressure Cooker Risotto

Risotto is a marvelous Italian side dish of creamy rice.  What is truly wonderful about risotto is the creaminess isn't from cream.   The starch within Arborio rice (or medium grain rice) is released while it is cooked in chicken stock. That is what creates the rich creamy taste.  This recipe came about as a way to use left over steamed brown rice.  My method is by no means authentic to true Risotto and I didn't even use Arborio rice, so I'm sure my non-existent Italian grandmother is upset with me again.

 Look at how creamy it is.


Ingredients for this Recipe Are:

3 cups cooked Medium Grain Brown Rice (I use Nishiki Brown Rice, you can find out about it here)
4 cups water
3 tablespoons Better than Bouillon Chicken Flavor
4 cloves of Peeled Garlic
1 cup Shredded Parmesan Cheese


Place rice, water, bouillon and garlic in Pressure Cooker pot.
Set pressure cooker to high for 6 minutes.

 After the cooking time has ended and pressure is allowed to naturally release add 1/2 cup 
parmesan and stir.

Serve risotto, adding parmesan to individual servings.

Enjoy!

Pressure Cooker Risotto
Printable Recipe Found Here

3 cups cooked Medium Grain Brown Rice (I use Nishiki Brown Rice)
4 cups water
3 tablespoons Better than Bouillon Chicken Flavor
4 cloves of Peeled Garlic
1 cup Shredded Parmesan Cheese

Place rice, water, bouillon and garlic in Pressure Cooker pot.
Set pressure cooker to high for 6 minutes.
After the cooking time has ended and pressure is allowed to naturally release add 1/2 cup parmesan and stir.

Serve risotto, adding parmesan to individual servings.

Enjoy!


Tuesday, March 4, 2014

Baked Chicken Wings

Chicken wings are David's favorite part of the chicken.  He had requested chicken wings as part of our February menu and I finally got around to making them.  Chicken wings are a yummy iconic Super Bowl snack, I think, I'm not sure.  We don't watch any sports at all, I married a nerd.  Most of the chicken wings are fried and then tossed with a spicy sauce and served with a bleu cheese dip.  My wings are baked, not fried, and I used my homemade hot sauce to flavor them.

 Don't these look delicious?


Ingredients for this recipe are:

4 lbs. Chicken Wings
1/2 cup Favorite Hot Sauce (I used my homemade hot sauce, recipe found here)
1 tablespoon Butter
Salt 
Freshly Ground Pepper

Preheat Oven to 400 Fahrenheit

 Remove chicken wing tips.
Pat the chicken dry.  
Place the chicken wings on aluminum foil lined sheet pan.

 Cook butter, hot sauce, salt, and freshly ground pepper over medium flame until mixed and melted.

 Bake chicken wings for 45-50 minutes.

 Toss chicken wings and sauce in large bowl.


Enjoy!

Baked Chicken Wings
Printable Recipe Found Here

4 lbs. Chicken Wings
1/4 cup Favorite Hot Sauce
1 tablespoon Butter
1/4 teaspoon Salt 
1/4 teaspoon Freshly Ground Pepper

Preheat Oven to 400 Fahrenheit
Remove chicken wing tips.
Pat the chicken dry.  
Place the chicken wings on aluminum foil lined sheet pan.
Cook butter, hot sauce, salt, and freshly ground pepper over medium flame until mixed and melted.
Bake chicken wings for 45-50 minutes.
Toss chicken wings and sauce in large bowl.

Enjoy!

Monday, March 3, 2014

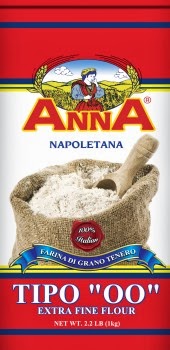
Stephanie's Food For Thought: Tipo 00 Flour


I am extremely blessed to live near a grocery store (Berry Fresh) that sells Tipo 00 Flour.  I buy it for $2.79 a bag, I think, don't quote me on that.  Tipo 00 Flour is a flour found in Italy and used to make those famous cakes and each restaurant in Naples uses a blend of this flour to make those amazing legendary Napoleon Pizzas.  Tipo 00 Flour is the key ingredient that makes Panetone, Pandoro, and pizza amazing, here in New York it is the flour pizzerias use to make their legendary pies.  Flour in Italy as you may recall reading from one of my previous posts is named for the grain size such as 0, 00, and 1.  Tipo 00 flour is a very finely milled white flour.  This week I had a break through in my pizza dough when I decided to combine this flour with Spelt to create both a tender and whole grain pizza dough.  I found an online retailer here if you want to purchase it.

Sunday, March 2, 2014

Butterfinger

My favorite candy bar, for as long as I can remember, is the Butterfinger.  It is a crispy, chocolate, peanut butter goodness, in a yellow wrapper.  Butterfingers are so yummy and in a milkshake you make something even more amazing.  When I was in High School, I worked at Hogi Yogi, a sandwich and yogurt fast food restaurant.  We used a special blending machine to add toppings to frozen yogurt.  One of the toppings was Butterfingers.  Mixed into frozen yogurt it was truly dessert Heaven on Earth.  I have been mulling over this candy bar and how to make it at home.  While searching for a recipe, I learned a majority of the recipes on the World Wide Web included Candy Corn as a main ingredient.  My goal is to make a Butterfinger without one of the ingredients being processed candy already.  Finally I stumbled upon a recipe that didn't include Candy Corn, so I knew I had found candy making gold.

 This Butterfinger is so much better than the store-bought version.


Ingredients for this recipe are:

1 cup smooth Peanut Butter
1 1/2 teaspoon Vanilla Extract
1/4 teaspoon Sea Salt
1 cup Cane Sugar
1/3 cup Light Corn Syrup
1/2 cup Water
1 cup Semi Sweet Chocolate Chips


 In a clean medium sized sauce pan, combine the sugar, corn syrup and water.  With clean hands, 
mix these ingredients together until no grains of sugar remain.  Wipe down the sides of the pan 
with a little more water to remove any sugar crystals.

On a medium-high heat, cook the sugar until it reaches 290 degrees Fahrenheit  


 Mix peanut butter, salt, and vanilla extract in a small bowl.  Microwave the peanut butter 
for 30 seconds.

 When the sugar mixture reaches 290 degrees Fahrenheit, quickly pour the warm peanut butter 
mixture into the sugar mixture.  Stir well.

  Pour into a buttered pan.  Spread with an offset spatula.

 Allow the mixture to cool for about 5 minutes and top with the chocolate chips.  Allow them to 
melt and spread with an offset spatula.

 Cool in the refrigerator for about 30 minutes.


Remove from the pan and cut into desired squares, rectangles, or eat all of it at once!

Enjoy!

Butterfinger
Printable Recipe Found Here

1 cup smooth Peanut Butter
1 1/2 teaspoon Vanilla Extract
1/4 teaspoon sea salt
1 cup Cane Sugar
1/3 cup Light Corn Syrup
1/2 cup water
3/4 cup semi Sweet Chocolate Chips

Butter an 8 inch square pan.  

In a clean medium sized sauce pan, combine the sugar, corn syrup and water.  With clean hands, mix these ingredients together until no grains of sugar remain.  Wipe down the sides of the pan with a little more water to remove any sugar crystals.

On a medium-high heat, cook the sugar until it reaches 290 degrees Fahrenheit  

Mix peanut butter, salt, and vanilla extract in a small bowl.  Microwave the peanut butter for 30 seconds.

When the sugar mixture reaches 290 degrees Fahrenheit, quickly pour the warm peanut butter mixture into the sugar mixture.  Stir well and pour into a buttered pan.  Spread with an offset spatula.

Allow the mixture to cool for about 5 minutes and top with the chocolate chips.  Allow them to melt and spread with an offset spatula.

Cool in the refrigerator for about 30 minutes.

Remove from the pan and cut into desired squares, rectangles, or eat all of it at once!

Enjoy!

Lamb Gyros

I love Greek food, and since I live in a very Greek neighborhood, it is really easy to find all the yummy food to make Greek Food.  Lamb Gyro's were my husband's dinner choice for our monthly menu.  Our friend's the Martinez's and Tina and Jessie came over to help make and eat Gyros. I love having Whitney and Tina over because they are so over the top helpful.  This recipe is sort of like Alton Brown's recipe, very loosely.  The gyro's turned out really, really, yummy, and I have no leftovers!  On an almost completely unrelated note, our tax refund was automatically deposited and we drove to the Apple Store on 5th Avenue (Manhattan) and I got a new MacBook Pro.  It is a wonderful computer!  

 Yes that is a lamb gyro and I made it!  I think I'm turning Greek.  I really think so (Just Kidding, I'm really English and Danish).


Ingredients for this recipe are:

4 lbs. Ground Lamb (freshly ground if you can get it)
1/4 cup Fresh Thyme
1/4 cup Fresh Rosemary
1 tablespoon Sea Salt
2 teaspoons Freshly Ground Pepper
6 cloves of Fresh Garlic
1 Yellow Onion


 Remove Thyme and Rosemary leaves from stems, chop the leaves small.

 Peel and finely dice the yellow onion.  Push garlic through garlic press.

 Using your hands to gently mix all the ingredients together in a metal mixing bowl.

Lay two pieces of 18 inch long plastic wrap with the long sides overlapping enough to seal and 
create a larger piece of plastic wrap.

Place the meat on the plastic wrap.  

 Wrap the plastic wrap around the meat and twist the ends until a tight log is formed.
Place lamb log into a plastic zip top bag and refrigerate over night.

Preheat oven to 325 Fahrenheit

Unwrap lamb and place on a aluminum foil lined small rectangular pan.

Bake lamb for 70 minutes or until internal temperature reaches 175 Fahrenheit.  

 Remove lamb from oven and allow to rest cover with aluminum foil for 10 minutes.

Slice meat and serve inside a pita with Tzaziki sauce (homemade recipe found here), sliced
cucumbers, Spring salad mix, crumbled feta cheese, Spanish Olives, and diced tomatoes.  

Enjoy!

Lamb Gyros
Printable Recipe Found Here

4 lbs. Ground Lamb (freshly ground if you can get it)
1/4 cup Fresh Thyme
1/4 cup Fresh Rosemary
1 tablespoon Sea Salt
2 teaspoons Freshly Ground Pepper
6 cloves of Fresh Garlic
1 Yellow Onion

Remove Thyme and Rosemary leaves from stems.  Chop the leaves small.

Peel and finely dice the yellow onion.

Push garlic through garlic press.

Using your hands gently mix all the ingredients together in a metal mixing bowl.

Lay two pieces of 18 inch long plastic wrap with the long sides overlapping enough to seal and create a larger piece of plastic wrap.

Place the meat on the plastic wrap.  Wrap the plastic wrap around the meat and twist the ends until a tight log is formed.

Place lamb log into a plastic zip top bag and refrigerate over night.

Preheat oven to 325 Fahrenheit

Unwrap lamb and place on a aluminum foil lined small rectangular pan.

Bake lamb for 70 minutes or until internal temperature reaches 175 Fahrenheit.  

Remove lamb from oven and allow to rest.  Cover with aluminum foil for 10 minutes.

Slice meat and serve inside a pita with Tzaziki sauce, sliced cucumbers, Spring salad mix, crumbled feta cheese, Spanish Olives, and diced tomatoes.  


Saturday, March 1, 2014

Stephanie's Kitchen Drawer: Countertop Rotisserie

My family and I love rotisserie chicken from Costco, remember my post about their chicken?  I have been thinking about a rotisserie for awhile. When we had a gas grill I wanted to get a rotisserie attachment but I never was able to find one.  I decided to get a countertop rotisserie instead since my grilling days might be long gone living in Queens now.  I bought the Ronco EZ Store Rotisserie Oven 5250 Series.  You can find this rotisserie through my aStore widget on the right hand side of my blog.
Here are my reasons:

1. It is small and can be taken apart and made more compact for easy storage, which I need in 
my small apartment.
2. 4 1/2 star rating on Amazon.
3. The price was right.
4. The features make it easy to use

I used my rotisserie to make Carnitas.   Oh my goodness, was it easy to use and the pork tasted 
out of this world good.  I have plans for cooking lamb, beef, and chicken at some point.  I am 
so very excited to expand my cooking options.